Ero sivun ”Kiltaretkikunnat” versioiden välillä
p (Harri siirsi sivun Guild Expeditions uudelle nimelle Kiltaretkikunnat luomatta ohjausta) |
Ei muokkausyhteenvetoa |
||
| Rivi 1: | Rivi 1: | ||
== | == Mitä ovat kiltojen retkikunnat? == | ||
Killan retkikunnat ovat monialustainen ominaisuus, jossa sinä ja kiltakaverisi taistelette läpi useiden taistelukenttien saadaksenne palkkioita ja killan voimaa. | |||
Retkikunnat alkavat automaattisesti joka tiistai ja kestävät 6 päivää (väliin jää 1 päivän aukko). Jokainen pelaaja joka on killan jäsen on saavuttanut rautakauden retkikunnan alkaessa, voi osallistua retkikuntaan. (Jos liityt kiltaan tai perustat uuden, joudut odottamaan seuraavan viikon retkikuntaa) | |||
Kun kirjaudut sisään retkikunnan ollessa käynnissä, näet popupin joka kertoo sinulle siitä. Kun menet retkikuntiin, näet kokonaan uuden ruudun. Vaikka se näyttää samalta kuin muut kartat, uusi ympäristö on viidakkomainen. | |||
== | == Retkikuntien kartta == | ||
[[File:ExpeditionMap.png|center|link=]] | [[File:ExpeditionMap.png|center|link=]] | ||
Retkikuntien kartta on suurimmalta osin peitetty sumulla: se selkiytyy kun etenet voiton polulla. Kartta, jonka näet tässä näkyy vain sinulle - jokaisella killan jäsenellä on oma karttansa. Sinulla on retkikunnan keston loppuun asti suorittaa kartta loppuun. | |||
Kaikille killan jäsenille yhteistä sen sijaan on retkikuntien tavoite, jonka näet ruudun yläreunassa (tai alareunassa, jos pelaat mobiililla) Voit osallistua tavoitteen saavuttamiseen ratkaisemalla kohtaamisia retkikuntakartalla. Sen hetkinen kohtaaminen näkyy keltaisella nuolella. Kun klikkaat sitä, pääset taisteluun tätä kohtaa hallussa pitävien joukkojen kanssa (tulevaisuudessa myös neuvottelu on mahdollista). Vastassa olevat yksiköt ja yleinen vaikeus määräytyy teknologiapuussa etenemisesi mukaan. Jotkut kohtaamiset ovat vaikeampia kuin toiset (etenkin isommissa kohtaamisessa olevat) ja joskus kohtaamiset sisältävät kahden aallon taisteluja. | |||
Nähdäksesi oman ja muiden killan jäsenten osallistumisen, klikkaa palkkia: | |||
[[File:ExpeditionGoalBar.png|center|link=]] | [[File:ExpeditionGoalBar.png|center|link=]] | ||
| Rivi 52: | Rivi 54: | ||
Once you've spent all 3 turns, you can only buy a turn with diamonds or give up the attempt and come back at a later time. If you decide to give up and try again later, the set of resources you can choose from will remain the same, but who wants what among the locals will be randomly changed. | Once you've spent all 3 turns, you can only buy a turn with diamonds or give up the attempt and come back at a later time. If you decide to give up and try again later, the set of resources you can choose from will remain the same, but who wants what among the locals will be randomly changed. | ||
== | == Vaikeustasot == | ||
Kartan voi tehdä kolme kertaa viikossa. Valloittaaksesi kartan uudelleen, sinun tulee avata seuraava vaikeustaso. Klikkaa tähteä nähdäksesi vaikeusasteet: | |||
[[File:ExpeditionsDifficulties.png|center|link=]] | [[File:ExpeditionsDifficulties.png|center|link=]] | ||
Kuten näet, oletusvaikeusaste on I ja se on avattuna ilmaiseksi. Jos haluat avata seuraavan tason, jonkun killan johtajista tulee maksaa tavaroita killan varastosta. Avaamisen hinnat riippuvat kiltalaisten määrästä ja aikakaudesta: | |||
== Temple of Relics == | == Temple of Relics == | ||
| Rivi 70: | Rivi 71: | ||
[[File:Ge_hud_relic.png|center|link=]] | [[File:Ge_hud_relic.png|center|link=]] | ||
Muinaisjäännöksiä on kolmea eri harvinaisuutta. Mitä harvinaisempi muinaisjäännös sitä paremmat ovat sen sisältämät palkinnot. | |||
Tästä näet mitä palkintoja voit saada: | |||
{| style="text-align:center;" | {| style="text-align:center;" | ||
!style="text-align: center;"| | !style="text-align: center;"| Tavallinen | ||
( | (hopea) | ||
![[File:ge_relic_common.png|50px|center|link=]] | ![[File:ge_relic_common.png|50px|center|link=]] | ||
!style="text-align: center;"| | !style="text-align: center;"| Epätavallinen | ||
( | (Kulta) | ||
![[File:ge_relic_uncommon.png|50px|center|link=]] | ![[File:ge_relic_uncommon.png|50px|center|link=]] | ||
!style="text-align: center;"| | !style="text-align: center;"| Harvinainen | ||
(Jade) | (Jade) | ||
![[File:ge_relic_rare.png|50px|center|link=]] | ![[File:ge_relic_rare.png|50px|center|link=]] | ||
|- | |- | ||
| <div style="text-align: center;">20 | | <div style="text-align: center;">20 Tutkimuspistettä</div> | ||
| <div style="text-align: center;">10%</div> | | <div style="text-align: center;">10%</div> | ||
| <div style="text-align: center;">100 | | <div style="text-align: center;">100 Tutkimuspistettä</div> | ||
| <div style="text-align: center;">20%</div> | | <div style="text-align: center;">20%</div> | ||
| <div style="text-align: center;"> | | <div style="text-align: center;">Keidas</div> | ||
| <div style="text-align: center;">35%</div> | | <div style="text-align: center;">35%</div> | ||
|- | |- | ||
| <div style="text-align: center;">25 | | <div style="text-align: center;">25 Tavaraa (samaa)</div> | ||
| <div style="text-align: center;">20%</div> | | <div style="text-align: center;">20%</div> | ||
| <div style="text-align: center;">200 | | <div style="text-align: center;">200 Tavaraa (samaa)</div> | ||
| <div style="text-align: center;">20%</div> | | <div style="text-align: center;">20%</div> | ||
| <div style="text-align: center;"> | | <div style="text-align: center;">Basaari</div> | ||
| <div style="text-align: center;">35%</div> | | <div style="text-align: center;">35%</div> | ||
|- | |- | ||
| <div style="text-align: center;">5 | | <div style="text-align: center;">5 kevyttä yksikköä</div> | ||
| <div style="text-align: center;">3%</div> | | <div style="text-align: center;">3%</div> | ||
| <div style="text-align: center;">10 | | <div style="text-align: center;">10 Roistoas</div> | ||
| <div style="text-align: center;">12,5%</div> | | <div style="text-align: center;">12,5%</div> | ||
| <div style="text-align: center;"> | | <div style="text-align: center;">Viisauden temppeli</div> | ||
| <div style="text-align: center;">10%</div> | | <div style="text-align: center;">10%</div> | ||
|- | |- | ||
| <div style="text-align: center;">5 | | <div style="text-align: center;">5 Ampuvaa yksikköä</div> | ||
| <div style="text-align: center;">3%</div> | | <div style="text-align: center;">3%</div> | ||
| <div style="text-align: center;"> | | <div style="text-align: center;">Vartiotuli</div> | ||
| <div style="text-align: center;">35%</div> | | <div style="text-align: center;">35%</div> | ||
| <div style="text-align: center;"> | | <div style="text-align: center;">Toivomuskaivo</div> | ||
| <div style="text-align: center;">10%</div> | | <div style="text-align: center;">10%</div> | ||
|- | |- | ||
| <div style="text-align: center;">5 | | <div style="text-align: center;">5 Nopeaa yksikköä</div> | ||
| <div style="text-align: center;">3%</div> | | <div style="text-align: center;">3%</div> | ||
| <div style="text-align: center;"> | | <div style="text-align: center;">Pieni mitalipaketti</div> | ||
| <div style="text-align: center;">12,5%</div> | | <div style="text-align: center;">12,5%</div> | ||
| <div style="text-align: center;"> | | <div style="text-align: center;">ehostuspaketti</div> | ||
| <div style="text-align: center;">10%</div> | | <div style="text-align: center;">10%</div> | ||
|- | |- | ||
| <div style="text-align: center;">5 | | <div style="text-align: center;">5 raskasta yksikköä</div> | ||
| <div style="text-align: center;">3%</div> | | <div style="text-align: center;">3%</div> | ||
|- | |- | ||
| <div style="text-align: center;">5 | | <div style="text-align: center;">5 tykistöyksikköä</div> | ||
| <div style="text-align: center;">3%</div> | | <div style="text-align: center;">3%</div> | ||
|- | |- | ||
| <div style="text-align: center;">Premium | | <div style="text-align: center;">Premium-koriste</div> | ||
| <div style="text-align: center;">25%</div> | | <div style="text-align: center;">25%</div> | ||
|- | |- | ||
| <div style="text-align: center;"> | | <div style="text-align: center;">Tuplarakennuspiirustus</div> | ||
| <div style="text-align: center;">30%</div> | | <div style="text-align: center;">30%</div> | ||
|- | |- | ||
|} | |} | ||
Versio 8. syyskuuta 2016 kello 13.00
Mitä ovat kiltojen retkikunnat?
Killan retkikunnat ovat monialustainen ominaisuus, jossa sinä ja kiltakaverisi taistelette läpi useiden taistelukenttien saadaksenne palkkioita ja killan voimaa.
Retkikunnat alkavat automaattisesti joka tiistai ja kestävät 6 päivää (väliin jää 1 päivän aukko). Jokainen pelaaja joka on killan jäsen on saavuttanut rautakauden retkikunnan alkaessa, voi osallistua retkikuntaan. (Jos liityt kiltaan tai perustat uuden, joudut odottamaan seuraavan viikon retkikuntaa)
Kun kirjaudut sisään retkikunnan ollessa käynnissä, näet popupin joka kertoo sinulle siitä. Kun menet retkikuntiin, näet kokonaan uuden ruudun. Vaikka se näyttää samalta kuin muut kartat, uusi ympäristö on viidakkomainen.
Retkikuntien kartta
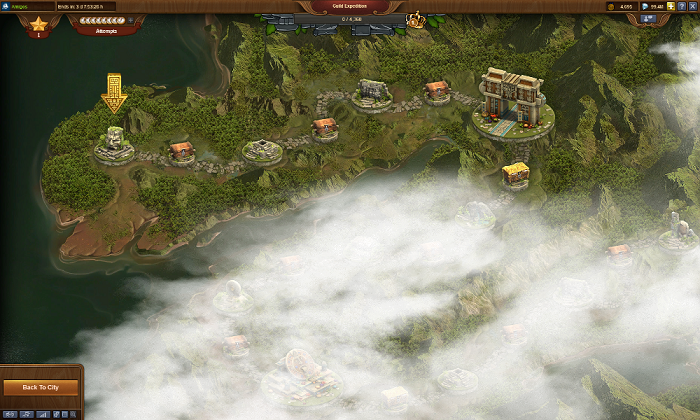
Retkikuntien kartta on suurimmalta osin peitetty sumulla: se selkiytyy kun etenet voiton polulla. Kartta, jonka näet tässä näkyy vain sinulle - jokaisella killan jäsenellä on oma karttansa. Sinulla on retkikunnan keston loppuun asti suorittaa kartta loppuun.
Kaikille killan jäsenille yhteistä sen sijaan on retkikuntien tavoite, jonka näet ruudun yläreunassa (tai alareunassa, jos pelaat mobiililla) Voit osallistua tavoitteen saavuttamiseen ratkaisemalla kohtaamisia retkikuntakartalla. Sen hetkinen kohtaaminen näkyy keltaisella nuolella. Kun klikkaat sitä, pääset taisteluun tätä kohtaa hallussa pitävien joukkojen kanssa (tulevaisuudessa myös neuvottelu on mahdollista). Vastassa olevat yksiköt ja yleinen vaikeus määräytyy teknologiapuussa etenemisesi mukaan. Jotkut kohtaamiset ovat vaikeampia kuin toiset (etenkin isommissa kohtaamisessa olevat) ja joskus kohtaamiset sisältävät kahden aallon taisteluja.
Nähdäksesi oman ja muiden killan jäsenten osallistumisen, klikkaa palkkia:
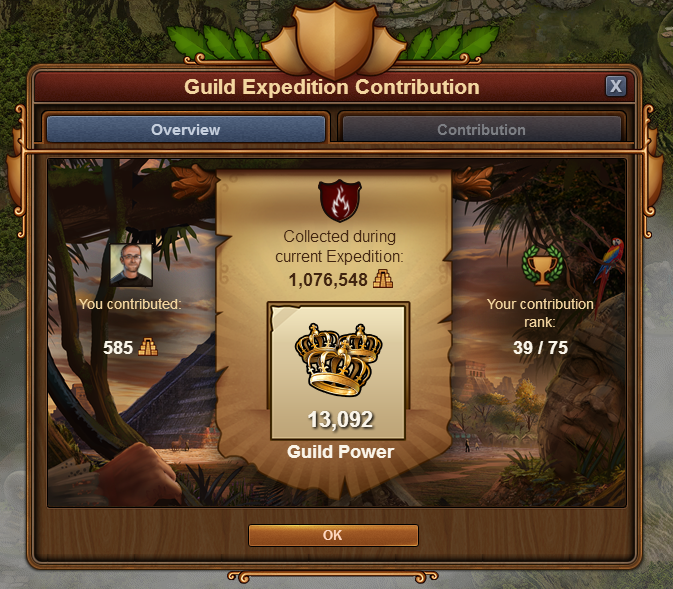
Expedition points come from the the main item you'll notice on the map - the various locations (called Encounters). These can be solved either by fighting or via a negotiation game. Whenever you solve an encounter you will also be able to collect a personal reward from the chest after it, and move on to the next encounter.
As you progress further, the fog from the map will also be lifted, revealing additional encounters and chests. Be aware that the 'larger' encounters will always be more challenging than the 'smaller' ones. If you've gotten lost on the map the golden arrow will point to your current spot!
Solving Encounters
The amount of consecutive encounter solving attempts is limited to 8 and each time you begin a battle or spend resources in a negotiation game, 1 attempt point is withdrawn. You can see the amount of attempts you still have on the attempts bar:
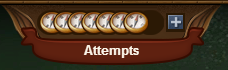
When you run out of them, you can either wait for them to regenerate (you get 1 per hour) or buy them with medals (or Diamonds). The medals price for each attempt will rise as you purchase more. At the end of the Expedition the cost will reset, so you will have a fresh start each week.
Regardless of the outcome of your attempt, you will contribute some expedition points to the guild progress bar (obviously if you lose, it won't be that much). The guild goals depend on the number and era of the guild members (these are set when the expeditions begin, they will not change even if you gain or lose guild members over the week) and are shared between all guild members.
Fighting
As we mentioned, you can solve encounters in one of two ways - fighting or negotiation. Fighting should already be known to you, because it is the same as everywhere in the game (the Continent Map, PvP, and GvG).
The units' age and the overall difficulty of the encounters depend on your own advancement in the tech tree when the expedition begins. You may also face two-wave battles, as well as units with boosted attack/defense depending on your own era.
Negotiation
When you hit the Negotiate button for the first time, you will see that you get approached by five locals. They will each want a specific resource from you, but they will not tell you which one! You will be able to select and offer resources to them:
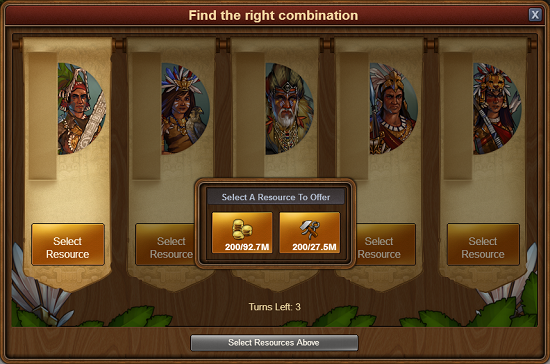
Once you have selected the resources, you can hit the 'Negotiate' button (at this point 1 attempt will be withdrawn from your attempts bar). Keep in mind that you will also be giving away these resources to the locals from your personal stock. The locals will then provide you with feedback on your guess, which will look like this:
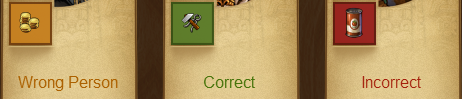
- Correct - your offer was accepted! However, other locals may also want this resource (though not necessarily).
- Wrong Person - your offer was rejected. But at least one other local is searching for this resource!
- Incorrect - your offer was rejected, and no local needs this resource (it will also be grayed out in the resource selection window on your next turn).
You have likely noticed the negotiation window has 'Turns' - this is because the locals want you to give them the correct resources in 3 turns. Every time you select 5 resources and hit 'Negotiate', you will spend a turn:
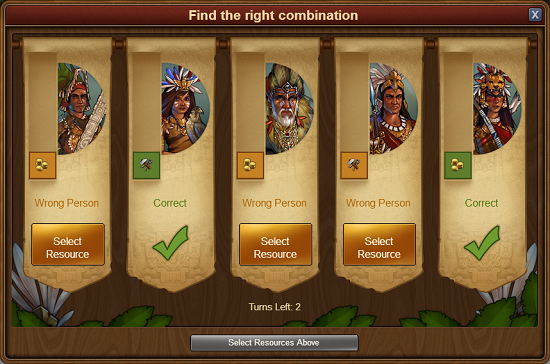
Once you've spent all 3 turns, you can only buy a turn with diamonds or give up the attempt and come back at a later time. If you decide to give up and try again later, the set of resources you can choose from will remain the same, but who wants what among the locals will be randomly changed.
Vaikeustasot
Kartan voi tehdä kolme kertaa viikossa. Valloittaaksesi kartan uudelleen, sinun tulee avata seuraava vaikeustaso. Klikkaa tähteä nähdäksesi vaikeusasteet:
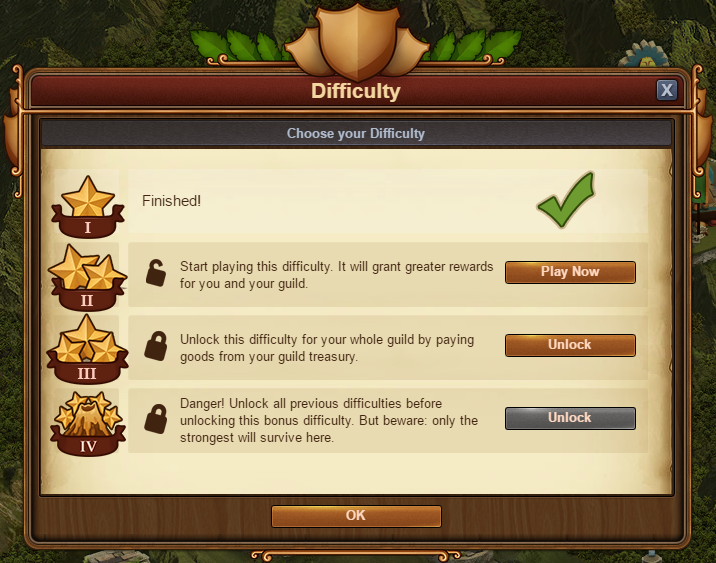
Kuten näet, oletusvaikeusaste on I ja se on avattuna ilmaiseksi. Jos haluat avata seuraavan tason, jonkun killan johtajista tulee maksaa tavaroita killan varastosta. Avaamisen hinnat riippuvat kiltalaisten määrästä ja aikakaudesta:
Temple of Relics
The Temple of Relics is a Great Building designed specifically for fans of Guild Expeditions. You can get blueprints for it either by solving encounters in expeditions, or by contributing to the same Great Building in cities of other players. It has only one passive bonus - the Relic Hunt ability.

Relic Hunt gives you a chance to find special rewards whenever you solve an encounter in an expedition. You will locate an icon on the right hand side on the expedition map - when it's highlighted it means there is at least 1 relic on the map that you can collect. If a relic is under a fogged area, you will need to progress on the map for the fog to disappear so that you can collect the relic. Make sure you collect any relics before proceeding to the next difficulty as any uncollected relics will disappear!

Muinaisjäännöksiä on kolmea eri harvinaisuutta. Mitä harvinaisempi muinaisjäännös sitä paremmat ovat sen sisältämät palkinnot.
Tästä näet mitä palkintoja voit saada:
| Tavallinen
(hopea) |
 |
Epätavallinen
(Kulta) |
 |
Harvinainen
(Jade) |
 |
|---|---|---|---|---|---|
20 Tutkimuspistettä
|
10%
|
100 Tutkimuspistettä
|
20%
|
Keidas
|
35%
|
25 Tavaraa (samaa)
|
20%
|
200 Tavaraa (samaa)
|
20%
|
Basaari
|
35%
|
5 kevyttä yksikköä
|
3%
|
10 Roistoas
|
12,5%
|
Viisauden temppeli
|
10%
|
5 Ampuvaa yksikköä
|
3%
|
Vartiotuli
|
35%
|
Toivomuskaivo
|
10%
|
5 Nopeaa yksikköä
|
3%
|
Pieni mitalipaketti
|
12,5%
|
ehostuspaketti
|
10%
|
5 raskasta yksikköä
|
3%
| ||||
5 tykistöyksikköä
|
3%
| ||||
Premium-koriste
|
25%
| ||||
Tuplarakennuspiirustus
|
30%
|